ASCII Portrait in Your GitHub Profile README
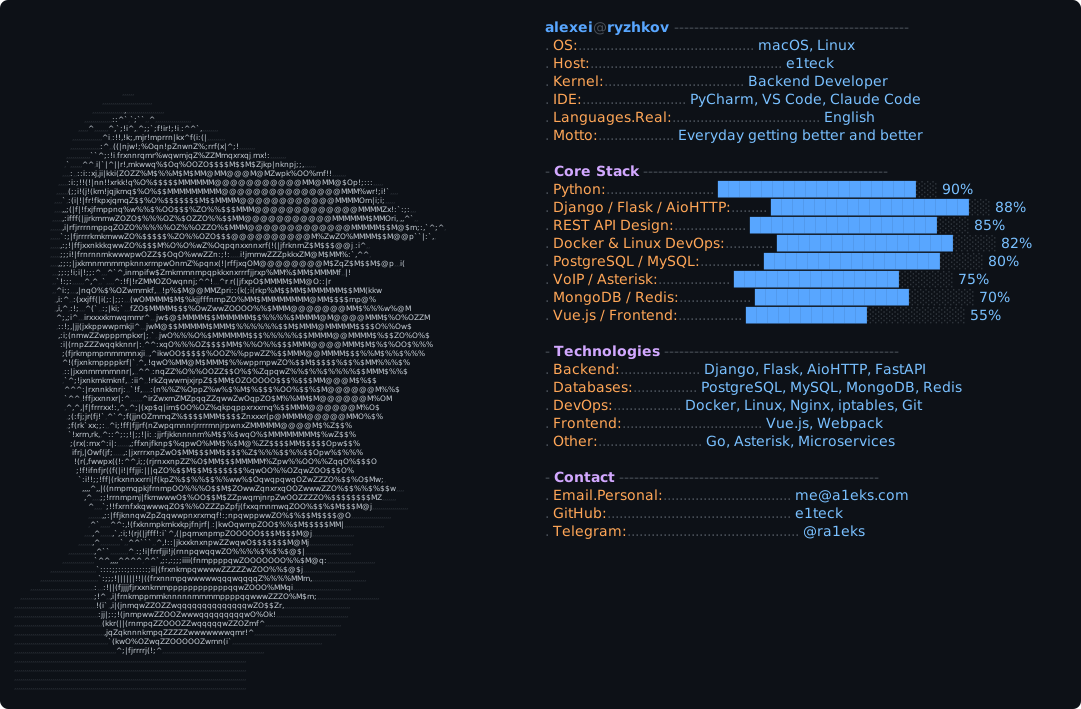
GitHub renders a profile README from the repository whose name matches your username (e.g. e1teck/e1teck). You can't color text in markdown — GitHub strips inline styles during sanitization. The only way to get colored monospace art is to embed it as an SVG image. To make it look right in both dark and light themes, you build two SVGs and switch them with a <picture> tag.
Three building blocks:
- A Python (Pillow) script that converts a photo into ASCII characters.
- A script that assembles the characters plus an info panel into two SVG files.
- A README.md with a
<picture>tag in the<username>/<username>repo.
Step 1. Photo → ASCII
Downscale the photo to a character grid and replace each pixel with a glyph of matching "density". For dark theme, bright pixels become dense glyphs (@M$%); for light theme it's inverted — dark pixels get the dense glyphs.
Key tricks without which you get mush:
- Remove the background. Flood fill from the frame edges marks the background, which becomes a mask. Important: only seed the fill from light pixels (brightness > 120), otherwise it eats dark clothing. Leftover background islands are removed via connected components — keep only the largest one.
- Boost contrast and sharpness before converting:
ImageEnhance.Contrast(1.4)+UnsharpMask— otherwise facial features vanish. - Vertical squeeze factor ~0.5: a terminal glyph is roughly twice as tall as it is wide, so grid height =
width × photo_aspect × 0.48. - Monochrome beats color. Per-glyph photo colors look fancy but destroy density contrast — the face reads worse.
Minimal example:
from PIL import Image, ImageOps, ImageEnhance, ImageFilter

W = 116                       # characters wide
ramp = " .'`^,:;i!|(fjrxnkmpqwZO%$M@"   # sparse -> dense

img = Image.open("photo.jpg")
g = ImageOps.grayscale(img)
g = ImageEnhance.Contrast(g).enhance(1.45)
g = g.filter(ImageFilter.UnsharpMask(radius=3, percent=200))
H = int(W * img.height / img.width * 0.48)
g = g.resize((W, H))

px = g.load()
for y in range(H):
    line = ""
    for x in range(W):
        v = px[x, y] / 255            # light theme: v = 1 - v
        line += ramp[int(v * (len(ramp) - 1))]
    print(line)
Step 2. ASCII → SVG
SVG gives you three superpowers plain markdown text doesn't have:
- Colors: labels, values and progress bars are styled with CSS classes inside
<style>. - A smaller font for the art: panel at 14px, art at 7.5px. The same area fits a 116×75 grid instead of 60×38 — twice the detail.
textLength: the viewer may not have your font, which would break line widths.textLength="..." lengthAdjust="spacingAndGlyphs"forces every line to an exact pixel width — alignment survives any font.
Each line is a <text> element with xml:space="preserve" (or the browser collapses spaces); colored fragments are <tspan class="...">:
<svg xmlns="http://www.w3.org/2000/svg" width="1081" height="709" viewBox="0 0 1081 709">
  <style>
    text { font-family: 'SFMono-Regular', Consolas, Menlo, monospace;
           font-size: 14px; white-space: pre }
    .art   { font-size: 7.5px; fill: #c9d1d9 }
    .label { fill: #ffa657 }
    .value { fill: #79c0ff }
    .barF  { fill: #58a6ff }
  </style>
  <rect width="100%" height="100%" fill="#0d1117" rx="8"/>
  <text x="14" y="27" xml:space="preserve" textLength="522.5"
        lengthAdjust="spacingAndGlyphs"><tspan class="label">. OS:</tspan><tspan class="value"> macOS, Linux</tspan></text>
  <!-- ... art and panel lines ... -->
</svg>
Progress bars are just █ and ░ glyphs in tspans with different classes:
. Python:................... ██████████████████░░ 90%Colors come from GitHub's palette: dark theme — background #0d1117, text #c9d1d9, blue #79c0ff, orange #ffa657; light theme — background #ffffff, text #24292f, blue #0550ae, red #cf222e.
Step 3. Publishing
- Create a public repo named after your username:
github.com/new→ namee1teck. GitHub confirms with "You found a secret!". - Upload
dark_mode.svgandlight_mode.svg— into the same repo or any other one (e.g. your website repo, then the images are also served from your own domain). - In README.md, use
<picture>— the browser picks the version matching the visitor's theme:
<a href="https://a1eks.com">
  <picture>
    <source media="(prefers-color-scheme: dark)"
            srcset="https://raw.githubusercontent.com/e1teck/a1eks.com/master/img/dark_mode.svg">
    <img alt="Alexei Ryzhkov" src="https://raw.githubusercontent.com/e1teck/a1eks.com/master/img/light_mode.svg">
  </picture>
</a>
Pitfalls I hit
- Art looks like a negative — invert the mapping for light theme: dark → dense glyphs.
- Background turned into glyph noise — flood fill from edges + mask + drop small connected components.
- Flood fill ate the dark t-shirt — only seed the fill from pixels brighter than 120.
- SVG lines misalign on other fonts —
textLength+lengthAdjust="spacingAndGlyphs". - Old image shows after updating the SVG — that's GitHub's camo cache; it refreshes in a few minutes.
- Default branch isn't
main— use the real branch name (master) in raw URLs.
The result lives at github.com/e1teck.